Tuesday 25 June 2013

Wales- Welsh Cakes


A Little History:

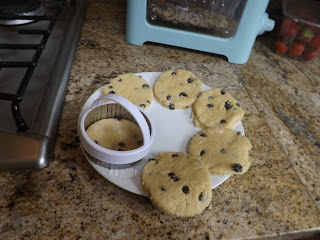
Welsh cakes are a traditional bake from Wales, in Welsh they are pronounced  picau ar y maen. The cakes are traditionally cooked on bakestones or a cast iron griddle. They are usually made with flour and currants or sultanas. People have added their own twist on the recipe by adding spices such as cinnamon or fruit such as apples. Most people serve Welsh cakes hot dusted with caster sugar and in order for a Welsh cake to be a Welsh cake it must be flat. 

Ingredients:


  • 225 grams/ 8 Oz Self Raising flour, sieved
  • 110 grams/ 4 Oz salted butter 
  • 1 egg
  • 85 grams/ 3 Oz caster sugar
  • handful of currents 
  • extra butter, for greasing


Method:

1. Rub the butter and flour together with your fingers until the mixture looks like breadcrumbs. Then add the sugar, currants and then the egg. Mix to combine, then for a ball of dough. If this doesn't happen add a splash of milk to the mixture. 


2. Roll out the pastry with a well floured rolling pin on a well floured surface until its roughly 5 mm thick and then cut into rounds using a 7-10 cm cutter.


3. For this step you need a bakestone or heavy iron griddle. If you are like and don't have one or can't afford one just use a frying pan. Rub your chosen cooking instrument with butter and then wipe of the excess, place on direct heat and wait until the pan heat up. When hot, place the welsh cakes on the pan, leave for 2-3 minutes or until the side of the pan is golden brown, then flip over and wait for the same results.


 4. Coat the Welsh cakes in sugar whilst they are still hot. Eat whilst looking at the valleys and the sheep!


Some people coat there Welsh cakes with jam and sandwich them together, others smother them with butter whilst they are still piping hot! I just like mine with the traditional sugar!

Its time to leave the UK and head over the channel to France!

Thank you to the BBC for the recipe and my friend Clara who took the photos, she took fifty photos in total, only 18 where on the blog, the rest where of her and my other friend! 


Sunday 23 June 2013

Ireland: Soda Bread

A Little History:

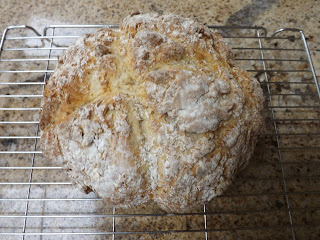
Soda Bread became popular in Europe around the 19th century after the discovery of Bicarbonate of Soda.  Bicarbonate of Soda became a popular alternative to other rising agents such as yeast. In Ireland, the bread is traditionally made using  a softer wheat, this means that the bread has lower levels of gluten than normal bread. The bread is usually made using buttermilk, but can be made using live natural yogurt or stout. As there is a no need to knead this bread it is an ideal bread to make for beginners in baking. 


Ingredients: 

  • 500 grams plain white bread flour, plus some for dusting
  • 1 teaspoon bicarbonate of soda
  • 1 teaspoon salt
  • 400 milliliters butter milk (when I baked this I only had 300 milliliters of buttermilk so I made it up with 100 milliliters of milk with a squeeze of lemon, you could 400 milliliters of milk and squeeze of lemon if you can't get a hold of buttermilk)


Method:


1. Heat your oven to 200 degrees centigrade and line a baking tray with baking paper or silicon paper (I suggest baking paper). 


2. Put all the dry ingredients into a large bowl and mix well, then add the butter milk and quickly mix with your hands until you have a sticky dough. Tip onto a lightly floured surface and shape it quickly into a balll, then flatten a little with your hand.


3. Put the dough on the baking tray and then, using either a dough scraper or knife, mark the dough into quarters, cutting deeply through the dough but not all the way to the bottom, sprinkle a little flour on the top.


4. Bake the bread for 30 minutes, to check if the bread is cooked- tip the dough and tap the bottom, it should sound hollow on the base, or it should be golden brown. Leave to cool on a wire rack. Soda bread is yummiest when eaten on the day, but you can freeze it if you are busy! It is also delicious toasted!


You can eat the bread with some butter or just on its own, or you could use it make a meal, like I did for my dad. I made him a mini ploughmans lunch with a large piece of the bread and cheese along with his favorite beer! This bread is a delicious alternative to normal white or whole grain bread and is also a great quick bread to make at the weekend or for dinner parties!!!


Thank you for reading, my next stop (and last stop in the UK) is Wales!


Thank you to Paul Hollywood for the recipe!!! :) 


Thursday 20 June 2013

Scotland- Shortbread

A Little History:

Shortbread originates from Scotland. It was made as part of a dessert using three ingredients: flour, sugar and butter. The recipe dates back to the 16th century and its name is believed to be given to the biscuit by Mary Queen of Scotts. There are many variations of the recipe such as being placed in a tin, cut into triangles and sprinkled with caraway seeds (these are know as "petticoat tails").

Ingredients:

  • 340 grams/ 12 oz unsalted butter, at room temperature 
  • 200 grams/ 7 oz sugar, plus a little more for sprinkling
  • one teaspoon of vanilla extract 
  • 440 grams/ 15 and half oz plain flour
  • a twist of salt


Method: 


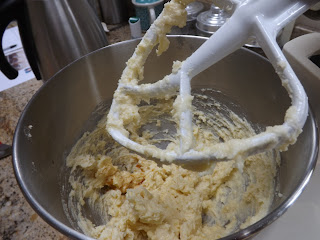
  1. Preheat the oven to 180 degrees Centigrade (or gas mark 4 if you have a gas oven). Mix together butter and sugar until pale and creamy, then add the vanilla.


2. Then sift the flour and the salt into the bowl and beat all the ingredients together until it forms and a dough.


3. Put the dough onto a well floured surface and shape into a flat disk (mine was meant to be a flat disk but went a little pear shape!) and then wrap in cling film and chill in the fridge for 30 minutes. 


4. After 30 minutes of chilling, place the dough onto a well floured surface and roll with a well floured rolling pin until 1 cm thick. Then take a cutter of your choice and stamp out the biscuits, the place them on a baking tray with a piece of greaseproof paper, then sprinkle a little caster sugar on the top. 


5. Put the biscuits in the oven for 15- 20 minutes (depending on how thick or thin your have made the biscuits they might need to be in the oven for 25 minutes) keep on eye on the biscuits. When they are done they should be slightly brown around the edges and the sugar shouldn't be completely visible. Take them out of the oven and then remove of the greaseproof paper with a palette knife. Leave to cool and serve with a cuppa and your favourite musical (well that's how I like mine anyway!!!) 


You can lots of different things to shortbread such as lavender, stem ginger, cinnamon and nutmeg. For a more luxurious experience you could dip one end of the biscuit in melted chocolate. You could also make these biscuits and decorate them with small children and immature adults, which will make for a great rainy day activity. They would also make a cute little birthday gift or pick me up for friends and family, place them stacked up in cellophane and tie with some pretty ribbon or string. 

Thank you very much for reading!! Next stop Ireland!!!!!!!!!

Thanks to Ina Garten for the recipe!!! :) 

Wednesday 19 June 2013

First Stop: England- Victoria Sandwich

A Little History:

The Victoria Sponge is classed a traditional British Cake. 
It was first made during the reign of Queen Victoria, who always fancied a piece of sponge cake with a little jam for her afternoon tea , therefore the cake was named "Victoria Sandwich". There are many ways in which the Victoria Sandwich is made and filled, some people put jam and buttercream between the two slices of sponge while others add whipped cream, some dust with caster sugar, others with icing sugar. The Woman's Institute however state that for a sponge to be classed as a Victoria Sandwich, it must have raspberry jam between the two pieces of cake and be dusted with caster sugar. I choose to fill my cake with this as I prefer the taste and texture as sometimes butter cream can make me feel a little poorly afterwards. 

Victoria Sandwich:

Ingredients:


  • 200 grams/ 7oz of plain flour
  • 200 grams/ 7 oz of caster sugar
  • 200 grams/ 7 oz of butter/ margarine
  • 2 drops of vanilla extract
  • 4 eggs (large)
  • 2 teaspoons (tsp) of baking powder

You will also need:

  • Two 20 cm round tins
  • Greaseproof Paper
  • Electric Scales
  • A butter knife
  • Electric beater (or a VERY strong arm!!!)
  • A pencil
  • Spatula 
  • Apron 

Method:

Preheat the oven to 180 degrees (350F) or gas mark 4, what ever your oven type is. Get your greaseproof paper and your pencil, draw around your cake tins, then cut out  your template of the cake tins. Grease the cake tins with a little butter/ margarine then put your template in the bottom of the tin, set these aside for later.


2. Put the butter/ margarine and caster sugar into your bowl and beat until light and creamy.


 3. Add half of the flour, two of the eggs and the vanilla to the bowl and beat well. Once all the flour has been beaten in, add the rest of the flour, eggs and the baking powder to the mix, then beat again until all incorporated, if there is flour up the sides, scrap with a spatula and beat lightly.


 4.  Separate the mixture evenly between the two tins, flatten with a spatula and then place in the oven for approximatly 30 minutes.


 5. After thirty minutes, check if the cakes are done by placing a skewer in the middle of both sponges and if it comes out clean then it is done. If the cakes are done, they should also shrink away from the sides of the tin. Take them out of the oven and leave them to cool in their tins.


 6. Once cool, turn out on to a wire rack and leave for five minutes or until completely cold. If the cakes are wonky, don't panic! Level them out with a knife by gently cutting a little off the top.

 7. Take out you raspberry jam and place a generous dollop on one the sponges, spread around until the cake is covered, then place the other sponge on top.

 8. Sprinkle with caster sugar, put the kettle on, sit outside in the sunshine and enjoy the sun!!!


 You can add buttercream, freshly whipped cream, icing sugar, different types of jam, lemon curd and other types of curd (I put passion fruit curd in the middle once, very nice!). I would avoid honey however, difficult to spread as its too runny and it doesn't taste very nice with the vanilla. During the summer, slices of fresh strawberries and whipped cream create a delicous summer garden treat.

Next stop: Scotland! :)

Thanks to Lorraine Pascale for the recipe inspiration!!!  (Baking Made Easy)